Guide to connecting Microsoft SQLServer with Java
(tested on MSSQL 2008-2012 and JDK 1.6 - 8)
Well, it is not so little of us who needs to connect to MSSQL with Java. It is not straight forward as it is to connect with MySQL (my personal favorite)! But we have to do it some times!
Before you continue, make sure the following! It may work with other settings but I am going to assume the following! If you get errors, make sure to search for that specific error or ask on StackOverflow
1. You are on windows 7 machine with admin privileges
2. You have a working MSSQL 2008 - 2012 Up and runnig
(You must be able to login using SSMS(SQL server management studio))
3. You can create and edit database user accounts
4. And You can access SQL Server Configuration Manager
If you have the above in place, come follow on a journey to make the world a better place!
Step 1: Setting up the JDBC Driver
I Assume you know what that is! I mean who doesn't? Among all the ways we can connect to MSSQL, I will try to discuss what I consider is officially Microsoft® approved!! To begin with download the driver to a suitable location!
Download it from Microsoft! It is an executable and let it install! It will unpack to
Go there and find a file with this name.
On NetBeans:

Then you can cleck on add JAR and locate
Well if this is just the Setting up the JDBC part!
Download it from Microsoft! It is an executable and let it install! It will unpack to
C:\Program Files\Microsoft JDBC Driver 4.x for SQL Server\sqljdbc_4.0Go there and find a file with this name.
sqljdb4.jar!
On NetBeans:
Then you can cleck on add JAR and locate
sqljdbc4.jar For more info on how to add a library in NetBeans follow this link.
Well if this is just the Setting up the JDBC part!
Step 2: Configure MSSQL Services and ports.
Now type this in Start, "SQL Server Configuration Manager" and open it and you should see the following window!

Click SQL Server Network Configuration on the left side. Then Double-click Protocols for SQLEXPRESS. (Assuming you are on default and SQLExpress is the server name you see on the login screen) and you will get something similar to this

Right click on TCP/IP and Click on Enable. Right Click again and click on properties.
On the following window

Find an entry that says IP All and confirm that the value of TCP Port is 1433! If not set it your self!
Before you close SQL Server Configuration Manager, click on SQL Server Services on the left panel! You should find something similar to this one!
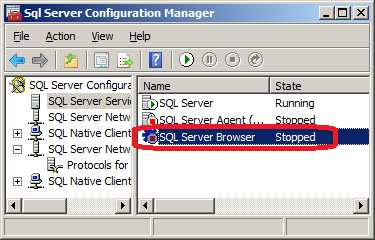
Right click on the SQLServer browser and enable it and start it! Then restart the SQLExpress service to apply your changes.
Well done! We only have to more steps to go!
Step 3: Setup an account to use from your project!
Now open up the SQL Server Management Studio!And Right click on the Server Name and click on properties!

Click on Security and select the radio button that says SQL Server and Windows Authentication.
And apply changes and close the dialog box.

On Object Explorer Click Security

Right Click on Login click new login
Enter Username & password

Create a database while you are in here!
Step 4: Writing the connection class
package com.amexsofts.mssql;

import eitex.sas.common.ExceptionLogger;
import java.sql.Connection;
import java.sql.DriverManager;
import java.sql.SQLException;
import java.util.logging.Level;
import java.util.logging.Logger;

public class ServerConnection {

    public static Connection getConnection() {
        Connection con = null;
        try {
            Class.forName("com.microsoft.sqlserver.jdbc.SQLServerDriver");
            con = DriverManager.getConnection("jdbc:sqlserver://localhost:1433;databaseName=<dbName>;instanceName=SQLEXPRESS;userName=<userName>;password=<password>");
        } catch (Exception ex) {
            ex.printStackTrace()
        }
        return con;
    }

    public static void main(String[] args) {
        getConnection();
    }
}
If you configured it correctly, runnig the above class will not cause you any Exceptions. Just be sure to replace <dbName> , <userName>and <password>
For any questions, comments, correction or feed-backs pleas use the bottom comment box or post it on my Facebook page AmexSofts Facebook page!
No comments:
Post a Comment