Saturday, September 19, 2015

Lomi: Kubet Lekema


After a month of fixing and breaking, we finally rolled out a decent finish of Lomi: Kubet Lekema. Behager Lij is working on so much more than just this. I personally coded this thing. And am honored to do so. But, as any software product it ain't done. It is likely it has a couple of bugs here and there. So, download it and hit me up with all the comments. I will either fix it or consider it for the next product. You can download it from here.

The game is powered by AndEngine. It is an amazing game framework for Android. You might want to check it out.

Here are some screen shots you might want to see. The images used in the game are soul properties of Behager Lij


Monday, August 10, 2015

Connect to a network without DHCP


You might be in some new town or some new school and there is no DHCP, or the DHCP is not responding. But you can physically connect to the network. That happens to me alot. I am now posting for a successful breaking an entry to a free WiFi here in Addis Abeba.

If for some reason you could not get an IP form the network, your computer will fail to connect to the network. For many cases, the network admins leave the IP range to the default values. You know '192.168.1.*'. and as you can guess the subnet mask to '255.255.255.0', and the default getway to the first valid address of the range, i.e '192.168.1.1'.

But some don't leave it that way. Specially if there is some more complicated networking done. So, how in the world do we find the range of IP addresses to guess from. Well if you get some IP addresses in use in the network, then the rest is making your IP address to something that is not used in the network.

Lets begin with finding the IP in use in the network. First we have to connect to the network. To do this we have to assign some random IP. Set a static IP address like the above one to your network interface.
Then Scan for active IP addresses in use in the network you are connected to. To achieve this, we need an ARP scanner in place. What we want to do is scan for packets that are being thrown around in the network. It captures packets and registers their IP and MAC addresses.

Thre are many ARP Scanners to choose from. For my linux enthusiast friends, netdiscover is good one. If you are using Backtrak or Kali linux, I hear it is already packaged with your penetration distro. For other linux users, go over

After installing your ARP scanner, somehow set it to passively listen to packets. To do this with netdiscover, run
sudo netdiscover -i wlan0 -p 

This will start instruct netdiscover to listen for packages without sending any requests. The result is any IP address currently communicating in the local network. It might take a while if there is no active device. My result looks like this one
 
Currently scanning: (passive)   |   Screen View: Unique Hosts                 
                                                                               
 21 Captured ARP Req/Rep packets, from 9 hosts.   Total size: 1260             
 _____________________________________________________________________________
   IP            At MAC Address      Count  Len   MAC Vendor                   
 ----------------------------------------------------------------------------- 
 0.0.0.0         f0:24:75:ad:c0:9e    03    180   Unknown vendor               
 169.254.132.101 f0:24:75:ad:c0:9e    03    180   Unknown vendor               
 10.11.3.54      14:58:d0:39:0d:02    05    300   Unknown vendor               
 0.0.0.0         28:cf:da:57:94:f9    03    180   Unknown vendor               
 169.254.34.169  28:cf:da:57:94:f9    02    120   Unknown vendor               
 10.11.6.42      b8:5a:73:62:b1:ec    02    120   Unknown vendor               
 10.11.6.17      84:db:ac:ad:99:70    01    060   Unknown vendor               
 10.11.6.26      b8:ca:3a:96:8f:82    01    060   Unknown vendor               
 10.15.4.10      64:51:06:26:1f:e6    01    060   Unknown vendor 

From this result I could see a list of valid IP addresses. You can see that most of the IP addresses are from '10.*.*.*' range. So you can start guessing from here.


Monday, December 1, 2014

Guide to connecting Microsoft SQLServer with Java

Guide to connecting Microsoft SQLServer  with Java 

(tested on MSSQL 2008-2012 and JDK 1.6 - 8)

Well, it is not so little of us who needs to connect to MSSQL with Java. It is not straight forward as it is to connect with MySQL (my personal favorite)! But we have to do it some times! 

Before you continue, make sure the following! It may work with other settings but I am going to assume the following! If you get errors, make sure to search for that specific error or ask on StackOverflow

1. You are on windows 7 machine with admin privileges 
2. You have a working MSSQL 2008 - 2012 Up and runnig
     (You must be able to login using SSMS(SQL server management studio))
3. You can create and edit database user accounts
4. And You can access SQL Server Configuration Manager

If you have the above in place, come follow on a journey to make the world a better place!

Step 1: Setting up the JDBC Driver

I Assume you know what that is! I mean who doesn't? Among all the ways we can connect to MSSQL, I will try to discuss what I consider is officially Microsoft® approved!! To begin with download the driver to a suitable location!
Download it from Microsoft! It is an executable and let it install! It will unpack to  C:\Program Files\Microsoft JDBC Driver 4.x for SQL Server\sqljdbc_4.0
Go there and find a file with this name. sqljdb4.jar!

That is the file we need! Grab that file and add it to your projects class path! For most IDEs this should work by simply copy and pasting it to project_home/lib directory.

On NetBeans:
Adding a library on NetBeans

Then you can cleck on add JAR and locate sqljdbc4.jar For more info on how to add a library in NetBeans follow this link.

Well if this is just the Setting up the  JDBC part!

Step 2: Configure MSSQL Services and ports.

Now type this in Start, "SQL Server Configuration Manager" and open it and you should see the following window!

SSCM

Click SQL Server Network Configuration on the left side. Then Double-click Protocols for SQLEXPRESS. (Assuming you are on default and SQLExpress is the server name you see on the login screen) and you will get something similar to this

SSCM

Right click on TCP/IP  and Click on Enable. Right Click again and click on properties.

On the following window

SSCM

Find an entry that says IP All and confirm that the value of TCP Port is 1433! If not set it your self!

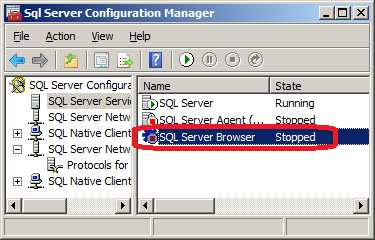
Before you close SQL Server Configuration Manager, click on SQL Server Services on the left panel! You should find something similar to this one!

SSCM

Right click on the SQLServer browser and enable it and start it! Then restart the SQLExpress service to apply your changes.

Well done! We only have to more steps to go!

Step 3: Setup an account to use from your project!

Now open up the SQL Server Management Studio!

And Right click on the Server Name and click on properties!
SSCM

Click on Security and select the radio button that says SQL Server and Windows Authentication.
 And apply changes and close the dialog box.

SSCM


1,Connect SQL Server by Windows Authentication method
On Object Explorer Click Security


Right Click on Login click new login
Enter Username & password


Create a database while you are in here!

Step 4: Writing the connection class


package com.amexsofts.mssql;

import eitex.sas.common.ExceptionLogger;
import java.sql.Connection;
import java.sql.DriverManager;
import java.sql.SQLException;
import java.util.logging.Level;
import java.util.logging.Logger;

public class ServerConnection {

    public static Connection getConnection() {
        Connection con = null;
        try {
            Class.forName("com.microsoft.sqlserver.jdbc.SQLServerDriver");
            con = DriverManager.getConnection("jdbc:sqlserver://localhost:1433;databaseName=<dbName>;instanceName=SQLEXPRESS;userName=<userName>;password=<password>");
        } catch (Exception ex) {
            ex.printStackTrace()
        }
        return con;
    }

    public static void main(String[] args) {
        getConnection();
    }
}


If you configured it correctly, runnig the above class will not cause you any Exceptions. Just be sure to replace <dbName> , <userName>and <password>

For any questions, comments, correction or feed-backs pleas use the bottom comment box or post it on my Facebook page AmexSofts Facebook page!

Monday, November 10, 2014

Take your android experience to the limit with third party Launcher applications.


What is a Launcher application?

Android launchers are apps that can spice up your phone's home screen or may act as a personal assistant. One of Android's best features is that you can design your phone's interface.
Unlike the iPhone, where Apple dictates how iOS looks and feels, you can personalize your Android home screen or app drawer with almost no effort. All you need is a launcher, also called a home-screen replacement, which is an app that modifies the software design and features of your phone's operating system without making any permanent changes.

Which one is the best?

I have only tested two launchers so far on my small memory device and my recommendation is C-Launcher  as it only takes a small memory and has a built in memory clean up widget! But if you have more memory, then i recommend GO Launcher EX  as it provides more flexibility and customization. Both you can use with out a penny from your pocket only need a way to download them!

 You can get them both at Google Play. And follow this link to download the .apk file for Go Launcher Ex directly.
http://file.appsapk.com/wp-content/uploads/downloads/GO%20Launcher%20EX.apk

But if you are looking a world wide comparison of android launcher products then take a look here.
13 best Android launcher apps by Android Authority!

Until next time, Stay safe!

Monday, November 3, 2014

Git and Empty Directories

Hello people!

I am not much of a blogger, I'm just getting started with it! But I wanted to share my learning experience  with the world and create my first opensource project!

How to Stage empty directories?


Anyone who works with git know the trouble I'm talking about. Git doesn't index directories (folder for windows users). It tracks content and directories are not exactly contents. Some might say why should i track empty directories any ways! I don't argue with them if they don't need them. But for me using gits caused me a lot of clathpath errors. It took me a hour of google to see that git will never index my directories until i put something in it! So the answer to the above question is you can't!

How to Trick git in to Staging empty Directories?

You can't tell git to index directories. There is just no way to do that! The only solution is to put something you don't even care about inside the directories. Then add those files! Job done!

Talking about putting something in it, what should i put? Well,  here is a convention programmers came up with. Put .gitkeep file in it! Other files are also alternative such as README and .gitignore! README is fine but .gitignore is not a good option because it is actually checked by git, so the more u have the more it could cause lags. Therefore I am sticking with the .gitkeep file.

So, Here is the problem I have a couple of hundred directories that i am not sure if empty or not! i can't just put .gitkeep everywhere! Ow' crap! that is a trouble that has just the simplest solution. 

Put your programming skill to use! I wrote a small programm to put .gitkeep file in every directory starting from the root of the project, that way i don't have to be bugged about any of the troubles!


Here is the code for the solution, just copy, past, change the root path then compile and run! Or go to git hub, fork modify it to be better and create a pull request! (Consider it my first opensource project, i know that is dumb)!

package gitkeep;

import java.io.File;
import java.io.FileWriter;
import java.io.IOException;

public class Walker {

 public static void main(String[] args) {
  // TODO Auto-generated method stub
  String rootFolder = "E:/Projects/Ongoing/Grails/AdeStyles/";

  File root = new File(rootFolder);

  System.out.println(root.isDirectory());
  walkTree(root);
  // root.listFiles();

 }

 public static void walkTree(File root) {
  if (root.isFile()) {
   return;
  } else if (root.isDirectory()) {
   // put an empty .keep file here
   File gitKeep = new File(root.getAbsolutePath()+"/.gitKeep");
   try {
    FileWriter w = new FileWriter(gitKeep);
    w.write("#This file is not ment to do anything!" 
                                         + " It is used to make empty directories"
             + " stay in the git repository so that classpath"
                                         + " error doesn' occur!");
    w.close();
   } catch (IOException e) {
    // TODO Auto-generated catch block
    e.printStackTrace();
   }
   System.out.println(root.getName());
   for(File file:root.listFiles()){
    walkTree(file);
   }
  } else {
   return;
  }
 }

}


Here, is a link to the github! amexboy/gitkeeper Please fork and make it better! And let us build a better world for our selves!